
The image above is another from my trip to the beach last month. It is my favorite of the whole trip, and I recently made a print of it. I thought I’d tell you how this particular image went from just an idea to a final print. However, if you want to skip all the details, and just see what the original RAW image looked like, you can just compare the final processed version above with the unprocessed RAW image below.
Prevision: It was near sunset and the tide was low. I had wanted a sunset shot with tide pools in the foreground, but that idea was out because of the fog bank I described in my earlier post . Instead I thought about an image with tide pools and the incoming waves mist-like on the shore. Because it was so gray out, for color I needed starfish (which are naturally purple and orange on this part of the coast) and green sea anemones. I wanted the starfish and selected tide pool to be the focus, with the rest of the image dark and misty (from the waves).
Camera Work: I found a several promising tide pools, some of which I showed in the earlier post. I spent a lot of time at this one, I thought the composition looked good, with the tide pool opening to the right rear and the big cluster of starfish. To blur the incoming waves into a mist, I knew I needed a long exposure, which forced me into using a small aperture. The final image was taken at ISO 100 and f/22 for 8 seconds. Obviously I used a tripod. I needed to be close to the tide pool, requiring a wide-angle lens to capture the entire scene. I put on my 10-22mm zoom and set it to 22mm. Finally, I wanted the center of interest to be the starfish on the far side of the pool. This was actually close to the darkest part of the scene. To help I used a flash to light up the far side of the tide pool. The original RAW capture, with just Lightroom defaults, is shown below.

Lightroom Processing: As you can see, even with the fill flash, the rock with the starfish was very dark. I knew it would take some dodging and burning work to bring it out to my original vision for the image. However, first things first. I always do global adjustments (those affecting the whole image) first before targeted ones. Usually my first step is to level the horizon and use LR’s lens correction feature. I typically use a bubble level on my hot shoe to help keep the horizon level when I shoot, but with the flash, that wasn’t possible. With the wide-angle zoom, there is a lot of distortion and chromatic aberration, both easily fixed in LR.

Next I adjusted the white balance. I slid LR’s blue-yellow slider to the right (yellow) to add warmth to the image.

The image needed a bit more contrast, so I then set the white and black points by using the Whites and Blacks sliders. In this case, I moved the sliders to broaden the histogram and add just a little clipping of both blacks and whites.

I knew I wanted to essentially invert the luminosity of the image, making most of the image darker and lightening up the back wall (which is dark in the original capture). To most effectively do this, I darkened the whole image by significantly moving the Exposure slider to the left (about 3/4 a stop), then recovered that much in the dark areas with the Shadows slider, moving it to the right.

This was generally it for global adjustments, at least initially. Now it was time to work on problem areas to bring out my vision. First, the sky and water was still too light. So I added a Graduated Filter in LR. I used a relatively soft edge, and set the center of the gradient about 1/4 the way down from the top, reducing the exposure by another 1/3 stop. Then to add a bit more contrast to the background rocks and water, I adjusted the Contrast slider on the filter to the right.

Next I knew I needed a lot of painting with the Adjustment Brush. First I needed to lighten up the main area of interest – the tide pool and nearby rocks. The following shows where I added the brush and the effect. I added about 1/2 stop with the Exposure slider and even more with the Highlights slider to bring out the highlights.


- Effect of first brush – lighten main area of interest
It was still to dark in my primary subject area, so I painted a second time in the area shown below. This time I added another 1/2 stop in exposure, with lighted up the shadows more, added some “crispness” with the Clarity slider, and bumped up the color with the Saturation slider. (Normally, I do not use the Saturation sliders much in LR. I more typically use the Vibrance slider as a global adjustment. Here, to really emphasis the back wall of the tide pool, I didn’t use the Vibrance slider at all, and only used the Saturation slider with targeted adjustments).


Now it was time to work on the water in the tide pool. I wanted the highlights in the water to show better, and for there to be more contrast between the light and dark portions of the water. So I added a little exposure and bumped up the Highlights and Contrast sliders. I also upped the saturation slightly.


That helped with the water, but I wanted the white areas of the water in the tide pool to be more pronounced, so I painted those areas with another adjustment brush to lighten them up.


I wanted to add a bit more color and lightness to the starfish and anemones (on the rock and in the water) in the foreground. So I added another adjustment brush, upping the exposure slightly and adding some saturation.


At this point, I liked the luminosity of the areas I had used the adjustment brushes on, but thought the rest of the image was too bright for my original vision. So I decreased the exposure slider by another 1/2 stop to darken the whole image.

Then I restored the exposure values to each of the previous adjustment brushes, adding back the 1/2 stop of exposure only in the brushed areas.

Then to further focus the eye to the center of the image, I added a vignette with the Post-Crop Vignette slider.

With that done, some of the rocks on the left still seemed a bit too bright. So with another adjustment brush, I made them slightly darker.


And, the white water at the mouth of the tide pool still looked a bit dark to me, so I added a seventh adjustment brush to brighten up this area a bit.


At this point, I was close to the final, pre-Photoshop image. However, with all the adjustment brush work, the image had lost contrast (mainly by darkening the highlights). I needed to re-establish the white clipping point to gain back the lost contrast. So I adjusted the whites slider upward and also fine-tuned the color temperature (cooling the image slightly).

But with that adjustment, some of the white water at the mouth of the tide pool was too bright, so I deleted part of the seventh adjustment brush.

Now it was time for some touch-up work with the spot removal tool to remove sensor dust spots (I’m bad, I don’t clean my sensor nearly often enough). The dust spots were very visible because of the small aperture used on the image. I was able to fix all of them except one straddling the surf line near the upper center of the image; I knew I’d need the cloning tool from Photoshop to fix that one.
At this point, I was done processing the RAW image in Lightroom. Though it looks close to my vision, I thought I could improve it a bit further in Photoshop (in addition to fixing the final dust spot). Before sending it to Photoshop, I applied some noise reduction.

Photoshop Processing: The first step in Photoshop was to adjust the global contrast again, this time using Curves, giving it a slight “S” adjustment, and giving the image some more pop.

I occasionally use a luminosity masking technique, known as the Triple Play, created by Tony Kuyper to improve the shadows and highlights when in Photoshop. I tried it out, and in this case, the Triple Play lead to a slight improvement in both the shadows and highlights.

I cloned out the final dust spot that I couldn’t fix in Lightroom. And then refined my previous Lightroom brushwork painting on a dodging/burning layer.

The final step was to apply a bit of sharpening and the image was complete. I use an adjustable sharpening action based on the book Real World Image Sharpening with Adobe Photoshop CS2 by Bruce Fraser. The sharpening applied here is intended to sharpen to remove the slight blur caused by the camera. With that, the image was complete and my vision was realized. Easy right?
After the processing was done, the only thing left to do was make a print (I do additional sharpening prior to printing after resizing the image). I made 10×15-inch print, matted it, and it is now hanging at the gallery in Gig Harbor where one of my photo clubs (Sound Exposure) hangs their work.
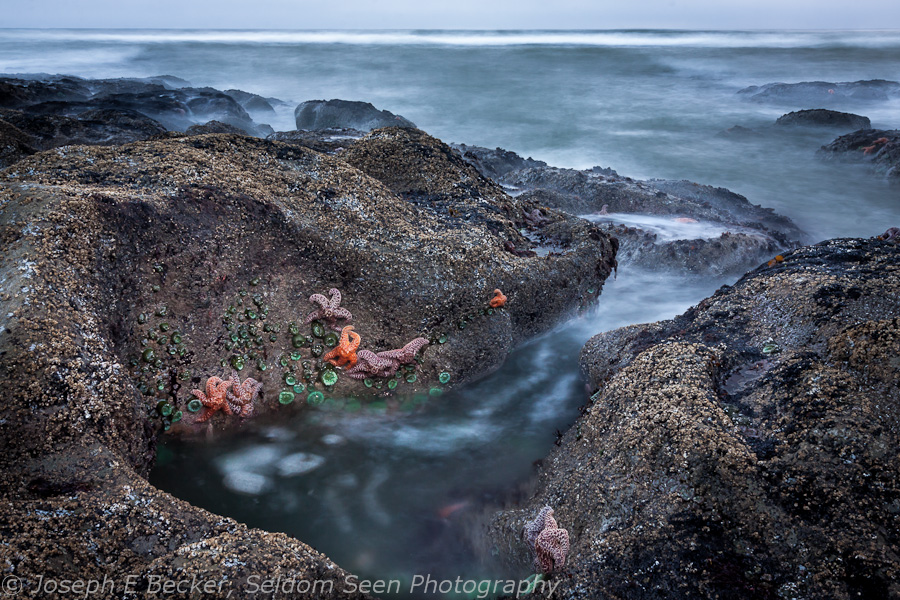
You might be asking, “how long did all this processing take?” Though I didn’t time myself, it took much less time to do than to write this blog post. I’d guess the complete processing, from RAW to the final photo below (not including printing) took about 30 to 40 minutes. I don’t spend that much time on every shot; but in this case, I think it was well worth it.

- The final image after source sharpening in Photoshop. This image is the same as the one at the top of the post and was used to make my final print.
Leave a Reply