 As I mentioned a recent post, last month I went backpacking in Olympic National Park along the coast with my brother Rob and his grandson, Izzy. Olympic National Park protects approximately 73 miles of Pacific Ocean coastline. The southern third of the beach is along US Highway 101. This beach extends from Ruby Beach in the north to Kalaloch in the south and is definitely worth a visit. But if you want a true wilderness beach experience, you need to visit the beaches north of Ruby Beach. The wilderness section of beach in the park is generally broken into two parts – known as the north and south Olympic wilderness coasts. The dividing line between the north and south sections is the Quillayute River and the town of La Push (which is at river’s mouth along the southern shore). Our trip was along the north coast, a total distance of about 32.5 miles.
Trailheads: there are three trailheads which access the northern Olympic coast. In the south is Rialto Beach, which is accessed by a road from the town of Forks (the town the Twilight series is based on). Near the middle of the northern coastal section, there is a trailhead at Lake Ozette (which has a campground and ranger station). Two trials to the beach leave Lake Ozette – one travels westward 3.1 miles to Cape Alava, and the other traverses 2.8 miles southwest to Sand Point. The distance between Cape Alava and Sand Point on the beach is about 3.1 miles, making a nice 9 mile loop hike out to and along the beach. The third trailhead, at the northern end of the coastal route, is on the Makah Indian Reservation and leads to Shi Shi Beach via a 2.2-mile long trail. The trail enters Olympic National Park shortly before reaching Shi Shi Beach.
We started our hike at the Shi Shi Beach trailhead and ended at Rialto Beach, traveling the entire 32.5 miles. Obviously other options are available for shorter trips – Shi Shi to Lake Ozette (via the Cape Alava trail) is 15.1 miles and Rialto to Lake Ozette (via the Sand Point trail) is 18 miles.

We decided to hike in a southerly direction for the simple reason that Tanya was picking us at the end, and by ending at Rialto, she could wait on the beach rather than in a muddy trailhead parking lot several miles from the beach. The trip can be traveled in either direction. However, the southern portion of the trip is easier than the northern part, so if you want to get the hardest part out of the way first, traveling south is the way to go. From a photographic point of view, it doesn’t make much difference, though if forced to pick, I’d say traveling north is better so the sun is at your back more often.
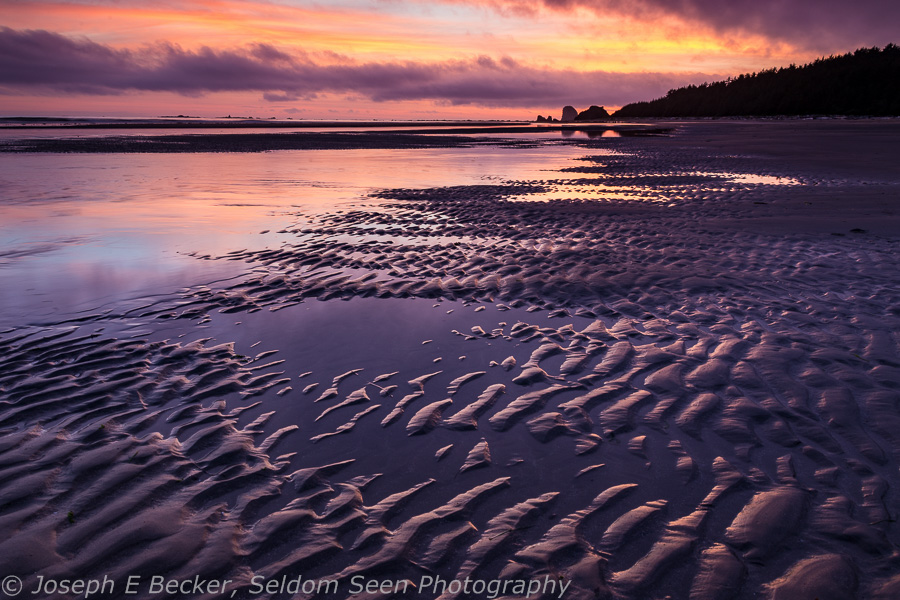
The “Trail”: for most of the hike, there is no trail. Instead, you walk along the beach. Sounds easy, right? Well, if the beach is a nice, fine sand beach, and you are hiking at anytime other than the highest tide, it is easy. But not all the beaches are nice, fine sand beaches. Some are made of coarse sand or gravel. These are still fairly easy to hike on, as long as you realize that for every step forward, you may slide backwards half a step. And some beaches are made of cobbles and small boulders, again not too bad to hike on if you are careful and the rocks are covered with seaweed, which they often are. I think of these small boulder beaches as the ankle twisting beaches.
But not all the “trail” is on beaches. Much of it is through large boulders along the shoreline. These boulder areas are typically at or near headlands. Headlands, of course, stick out into the ocean. There are at least 19 headlands along the route. Many of the headlands can be walked around at low tide, two are impassable on the water side and must be traversed over their tops. For many, you have the choice of walking around, or going over. We usually went around them if we had a choice, but going around was not necessarily easy. Between the boulders, large tide pools, slick seaweed, and incoming tide, going around headlands is often a slow and tiring process. We could easily travel 3 miles per hour along the nice sandy beaches, but going around some of the headlands, we were lucky to make 1 mile in an hour.

For the two headlands impassable at any tide, and the many others that can be crossed by going over their tops, there are “trails.” I put trails in quotes because they are not what I consider a normal trail. They are straight up and down, often with few hand and foot holds. They would be impassable, especially when wearing a heavy backpack, except for the aid of strategically placed ropes which allow hikers to pull themselves up and down. We knew there were ropes. What we didn’t know is that the ropes are typically rough braided and weathered synthetics. They are very rough on the hands. I suggest bring a pair of leather gloves. (Rob was lucky, he found a pair of leather gloves on the second day of our trip.) Most of these trails are 0.1 to 0.2 miles in length; however, south of Shi Shi Beach, there are two rails of 0.4 and 0.7 miles.
Camping: the Park Service maintains a number of wilderness campgrounds along the coast. All require use of a bear canister to to store food (bear canisters can be borrowed free of charge from the Olympic National Park Wilderness Information Center, or the WIC, in Port Angeles). Not that there are a lot of bears on the coast (there may be a few), but racoons expert in separating hikers from their food are plentiful. All campgrounds are located near a source of fresh water, which is surprising scarce on the coast (particularly this summer with the drought the Pacific Northwest is having). Most have a backcountry toilet available. Permits are required at all campsites, and reservations are required at the campgrounds within a day’s hike of Lake Ozette (from north to south, Seafield Creek, North Ozette River, South Ozette River, Cape Alava, Wedding Rocks, Sand Point, South Sand Point, and Yellow Banks). Outside the reservation camps, backpackers can camp outside the official campgrounds.

Permits: as mentioned above, permits are required to camp overnight on the wilderness coast in Olympic National Park. Permits are available from the WIC. If camping in the reservation area, you may wish to request your permit at least several weeks prior to your trip. Permits cost $5 per person per night. The Makah Indian Reservation also requires recreational permits for use of trails and beachs on the reservation. So technically, if using the Shi Shi trailhead, you probably need a permit. However, the permits are to be displayed in your car while parking at the trailhead. However, overnight parking is not allowed at the Shi Shi trailhead. Instead, you need to park in a pay lot about half a mile from the trailhead (charge of $10 per night). We only had our car at the trailhead long enough to drop off our gear. Makah permits are available at several locations in the town of Neah Bay (which you drive through to get to the Shi Shi trailhead).
Tides: though 10-mile days may not be a problem on many backpacking trips, going 10 miles or more a day on the coast is difficult. We spent five nights traveling our 32 miles. Doing it in four days would have been possible; three days would be difficult. The reason – those headlands I spoke of earlier. You need to schedule your hike based on tides. The last thing you want to do is get halfway around a headland and get stuck by the tide – depending your location, that could be life threatening. You absolutely need to carry a tide chart with you. I also recommend the custom coast maps available from Discover Your Northwest. These maps (0ne for the north coast, and one for the south) show the tide levels at which headlands can be rounded. Depending on how many headlands you may need to round in a day and the tides that day, you may only be able to hike in the morning or evening. Further, you may be stuck by the tide for four or five hours – as we were twice during our trip.

The Route, Shi Shi to South Sand Point: as mentioned above, we started at Shi Shi Beach. This beach if very popular, and on summer weekends, it can be crowded. We started on a Monday, and it was not a problem. Shi Shi is a very beautiful beach and is easy to hike on. The trail to Shi Shi is muddy, even in the drought we are currently experiencing. There are many great places to camp on Shi Shi, with three official campgrounds – one on the northern end where the trail comes out, one in the center where a creeks exits the hills to the beach, and one at the southern end at a small creek. We camped at the southern end. This was great location, very close to the Point of Arches, making for great photography. There are also lots of nice tide pools at the Point of Arches.
South of Shi Shi, getting around the Point of Arches requires a tide of 4.5 feet or lower, though there is also an overland trail. The next several miles, by a series of headlands, are the most difficult of the entire hike. There are several long overland trails in this area, but there are also several place that require low tides to get around (depending on the headland, tides of 4 to 6 feet or lower are required). We were stranded for four hours in this area. Though difficult, the scenery is spectacular.
South of this series of headlands, there is a long section of beach without headlands, though most of is not sandy. This section, which goes by the Seafield Creek camp and stretches to the North Ozette River camp, is easy enough to hike at low to medium tides. However, it could be difficult at high tide, when the water can reach up the beach into the driftwood (which is typically large to very large logs – not easy to walk through). We camped at North Ozette, which has a nice site above the driftwood and several more in the trees. (Unfortunately, when we were there, we did not get one of the nicer sites as another party was taking up four campsites. They did give up one for us, but were using perhaps the best spot as their kitchen area.)
The two campgrounds at the Ozette River are separated, wait for it, by the Ozette River. There is no bridge across the river. You will get wet crossing the river. How wet depends on the tide. At low tides, it may be ankle-deep. At high tide, forget it. We crossed at a tide of about 1 foot, taking off our boots and socks, and the water was a bit more than ankle-deep. It is probably passable at tides up to about 3 or 4 feet without a problem.
If you camp at the Ozette River, you will need to go as far upstream as possible to collect fresh water. At high tide, salt water backs up into the river, making the water at and near the mouth of the river very saline.
South of the river, there are a couple small headlands needing 4 and 5 foot tides or lower to pass (no overland trails available) followed by rocky beaches to Cape Alava. Cape Alava is the site of a pre-historic Indian village. In this area, where the trail from Lake Ozette comes in, you will start seeing a lot more people as you encounter day hikers.
About one mile south of Cape Alava is Wedding Rocks. This is worth a definite stop as there are petroglyphs present on many of the rocks. The best petroglyphs (orca whales and people’s faces) are at the southern end, near the start of another rocky beach (and near the southern end of the overland trail around the Wedding Rocks).
Past Wedding Rocks the beach is rocky, but not too difficult for a mile or so, then becomes sandy near Sand Point (where the other trail from Lake Ozette comes in). The campground at Sound Point is quite large. We instead camped at South Sand Point, a further 0.6 miles down the beach. The hiking near Sand Point is probably the easiest on the whole route, being along a broad sandy beach.
In my next post, I’ll go over the rest of the route. All the photos shown here are from this northern half.


Leave a Reply